
If you’re struggling to turn visitors into email subscribers on your website, then something is wrong. You need those emails if you’re serious about selling online.
Email is the best place to reach consumers. Yes, there’re lots of marketing channels today, but none of them beats the revenue marketers are generating from email marketing.
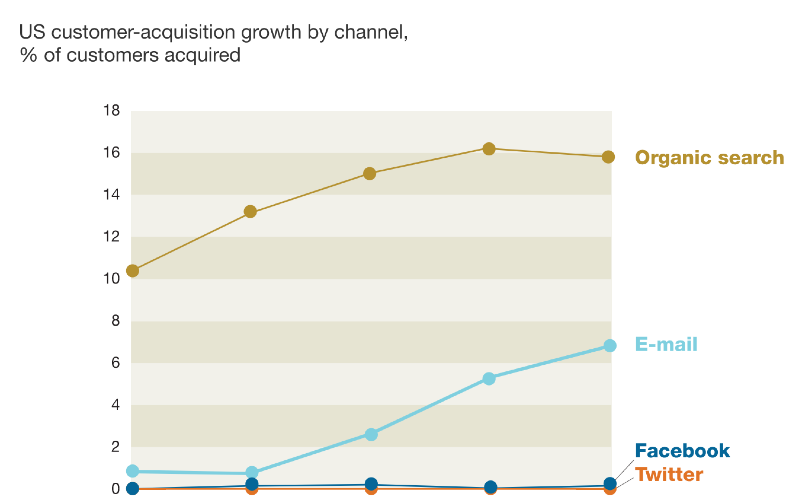
According to McKinsey, email is 40 times more effective at acquiring new customers than Facebook or Twitter.
If you do it right, email can be the most important marketing channel for your business. The ability to get into customers’ emails anytime is an amazing opportunity you shouldn’t miss.
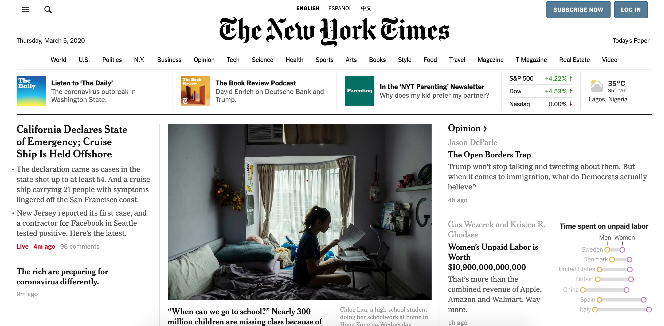
WordPress is the most popular content management system (CMS) today. Almost every popular business and magazines use WordPress to power their websites. For example, reputable publishers like the New York Times and Entrepreneur.com use WordPress.
One of the reasons WordPress is popular today is because it’s straightforward to use, and it’s open source. Open source means that nobody owns it.
With smart tools, you can quickly create popups for a site built with WordPress.
I guess that you’ve seen popups many times on the web. The truth is that popups work. They collect emails.
OmniKick is powerful software for creating popups. Popups created with OmniKick collect lots of emails.
Our tool gives website owners more targeting options when creating popups. Our popup editor is also simple and beginner-friendly.
In this article, you’ll learn how to create a high-converting popup using OmniKick.
How to Create a WordPress Popup Form Visitors Can’t Ignore
Email marketing has the highest conversion rates of any marketing channel. It’s the best channel to get high-value leads.
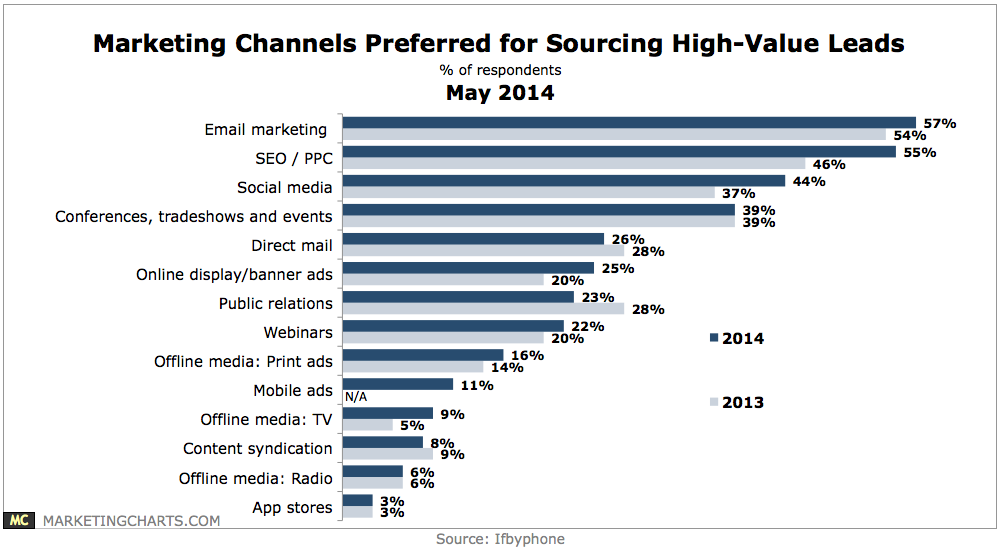
Both B2B and B2c companies are using email marketing to build stronger relationships with prospects and generate demand for their products and services.
Popups are one of the best ways to build an email list of potential buyers quickly. But the harsh truth is, popups don’t work for most website owners who use them.
The reason why is simple:
Most websites show popups to every visitor within seconds of the page load. That’s the worst way to use popups.
People won’t pay attention to an intrusive popup immediately they land on a page. They want to see the content that brought them to that page first.
There’s a smarter way to use popups:
Instead of showing popups to people who may not want to see it, present popups only when visitors wish to view it.
When you show popups to visitors when they want to see it, they’ll be happy to subscribe.
And when you do that, you won’t appear annoying.
Very few popup tools can let you create these kinds of popups. OmniKick gives you more options to display popups only when visitors are interested in subscribing.
The Optin Link (2-step Optin) feature is one of our most popular features, which you won’t find in most WordPress popup builders.
What’s the Optin Link feature about?
It’s a 2-step optin process where the form pops up when visitors click on a particular link. Of course, the visitor would have known that they’ll see a form that asks for their details before they click on the link.
The below sketch illustrates how this feature works.
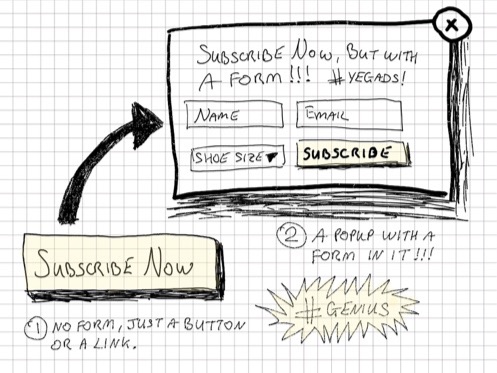
With this feature, your site won’t annoy visitors again. They will be happy to click the link only when they want to give you their details.
Are you ready to explode your email list with this powerful OmniKick feature?
Step 1: Sign up for OmniKick
You need to sign up for OmniKick if you don’t have an account. It’s free to get started. Start your free trial here.
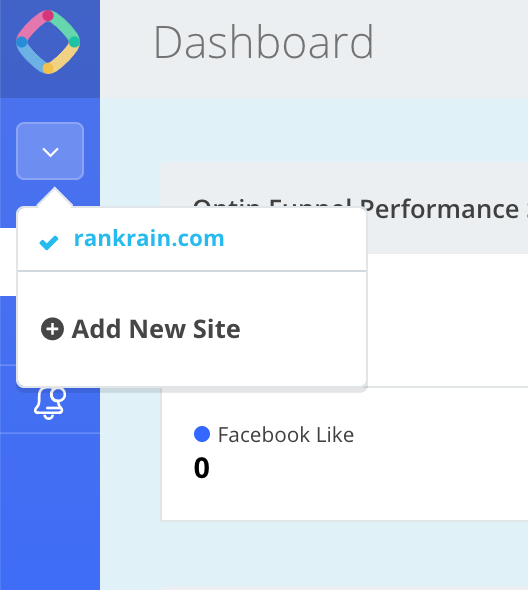
After you’ve signed up for OmniKick, you’ll need to add your website to your OmniKick account before you can start creating popups.
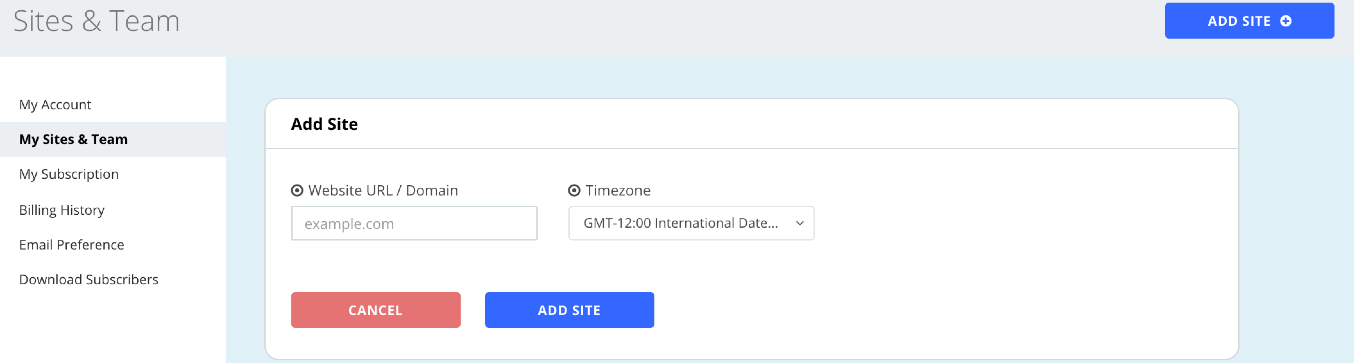
Input the domain name of your website, the Time zone you want to use for your account, and click “Add Site.”
And after your site is added to OmniKick, you’ll need to add some code to the header of your WordPress website.
If you don’t know much about code, I strongly recommend that you go to the Plugin section of your WordPress site and click on “Add New.”
You’ll be taken to a page where you can search for plugins. Type “Insert Headers and Footers.”
The search results will return a plugin with that exact name. The plugin is created by “WPBeginner.”
Click on “Install Now” to install the plugin.
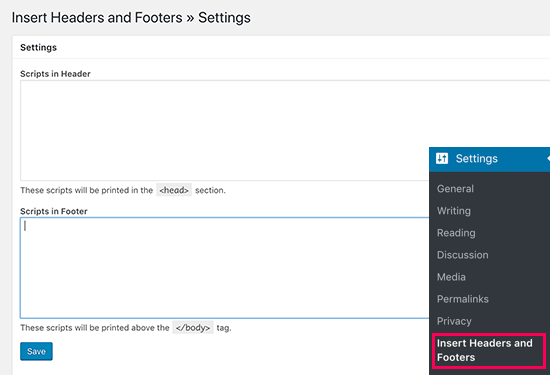
After installing the plugin, Go to “Settings.” You’ll find “Insert Headers and Footers.”
Copy the code given to you by OmniKick and paste it in the “Scripts in Header” box.
Now that you have OmniKick code installed on your WordPress website, it’s time to start creating popup campaigns.
Step 2: Create your popup campaign
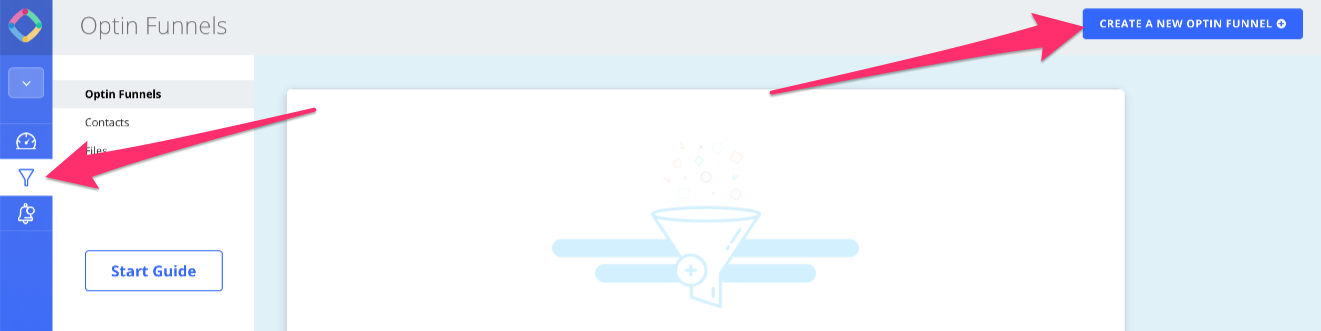
Inside the OmniKick dashboard, click the “Optin Funnel” icon on the top left of the screen. Then click “Create a New Optin Funnel.”
You’ll see that there’re five types of popups available in OmniKick.
- PopUp Optin Box
- FullScreen Welcome Gate
- Slider Optin Box
- Inline Optin Box
- Floating Box
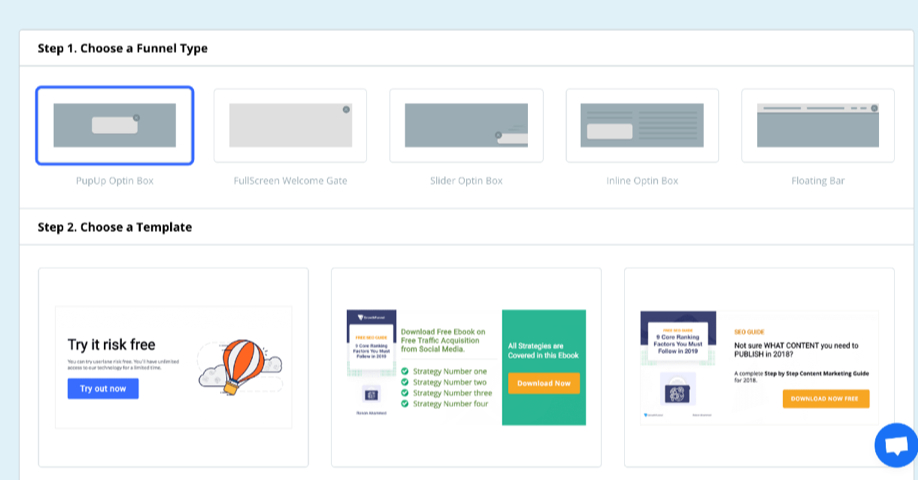
All of them are all great popup types. But the ideal types for the 2-step optin feature are PopUp Optin Box and FullScreen Welcome Gate.
After choosing the funnel type you want to use for your campaign, it’s time to select a template.
OmniKick has some amazing pre-made templates to help you quickly get started with your campaigns. Choose the one that looks most appealing to you.
You’ll be taken to our Funnel Editor, where you’ll edit your newly created popup campaign.
Step 3: Edit your popup campaign
OmniKick’s Funnel Editor is very easy to use.
Inside the editor, you’ll need to edit some things to match your message and goals.
First, you’ll need to change the image in the template. We used the image to create the template. You should have an image ready to use for your campaign. So, replace that image.
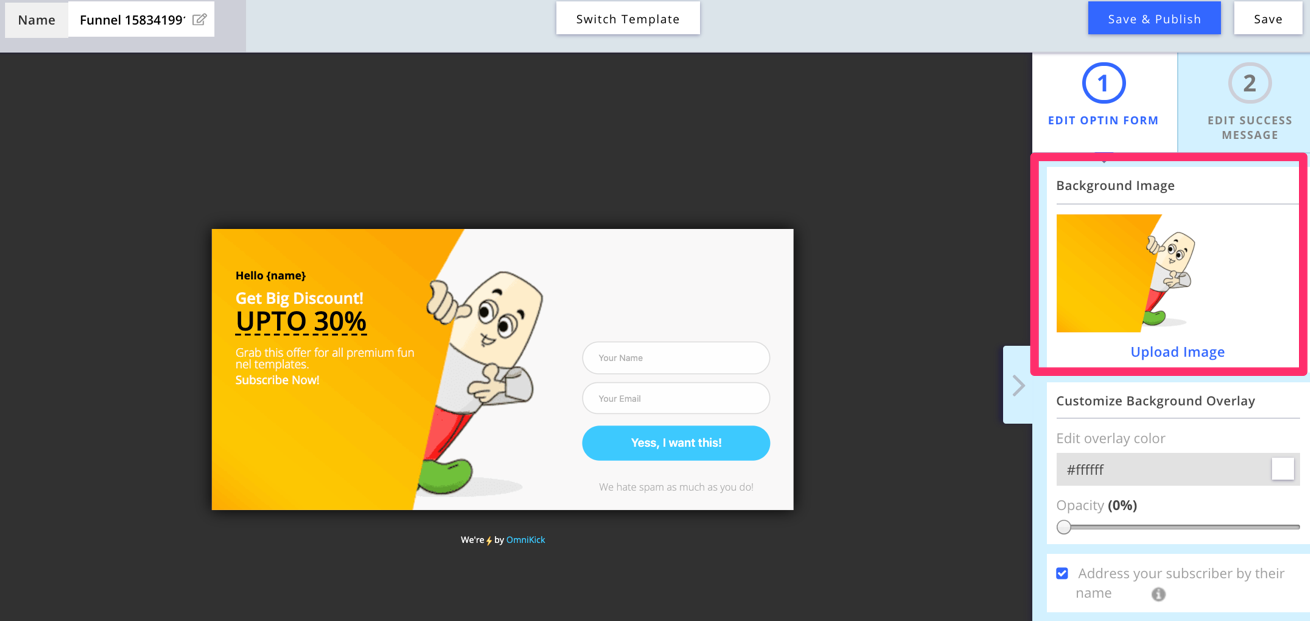
If you don’t have an image, you can get a free stock photo from Unsplash.
Once you’ve replaced the image, the next thing to do is to replace the button text. Remove the current button copy in the “Edit Button Text” with yours.
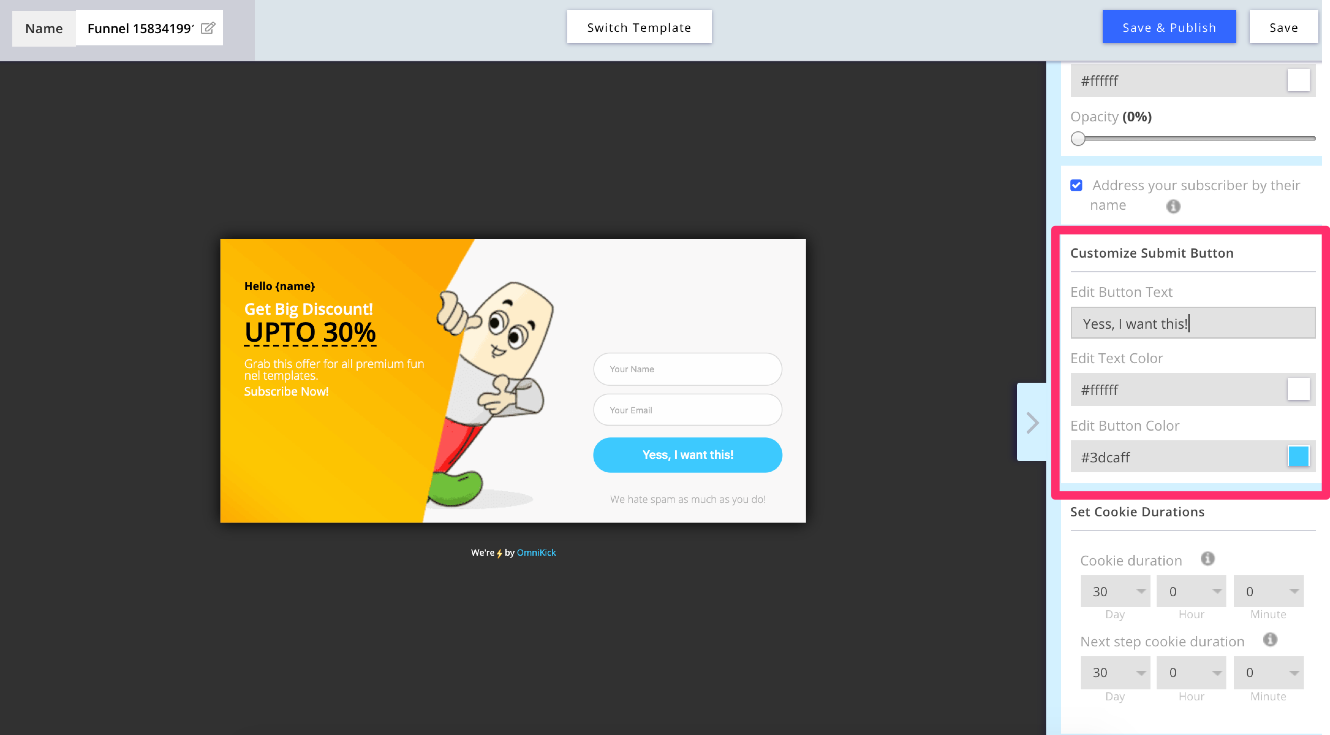
After doing that, you may want to edit the color of the text in the button.
Another thing you want to edit is the popup copy. The current copy we used is there to be replaced with yours.
You can quickly and easily change the text by clicking on it. You can even change the font and size of the text if you want to do that.

Continue moving around the editor and change the things you don’t like. We’ve built the funnel editor to be beginner-friendly.
If you can use browsers like Firefox and Chrome, then you can work with our funnel editor. So, don’t be scared of the editor when you see it.
You don’t need a web developer or designer to use it. You can create a popup inside the editor all by yourself and start collecting email addresses immediately.
Step 3: Integrate OmniKick with your Email Provider
OmniKick is a popup builder for collecting visitors’ emails on the website. We don’t store the emails. You’ll have to save the emails with your email service provider.
OmniKick integrates nicely with popular email service providers like MailChimp, AWeber, Campaign Monitor, ConvertKit, Constant Contact, and others. Our tool works with most of these providers.
All you need is an API key from your email service provider.
Let’s discuss how to add your email provider to OmniKick. Let’s use MailChimp as an example.
So, how do you get your API key from MailChimp?
Login into your MailChimp account. At the top right of your account, click on your username, and you’ll find “Profile” on the dropdown menu. Click it.
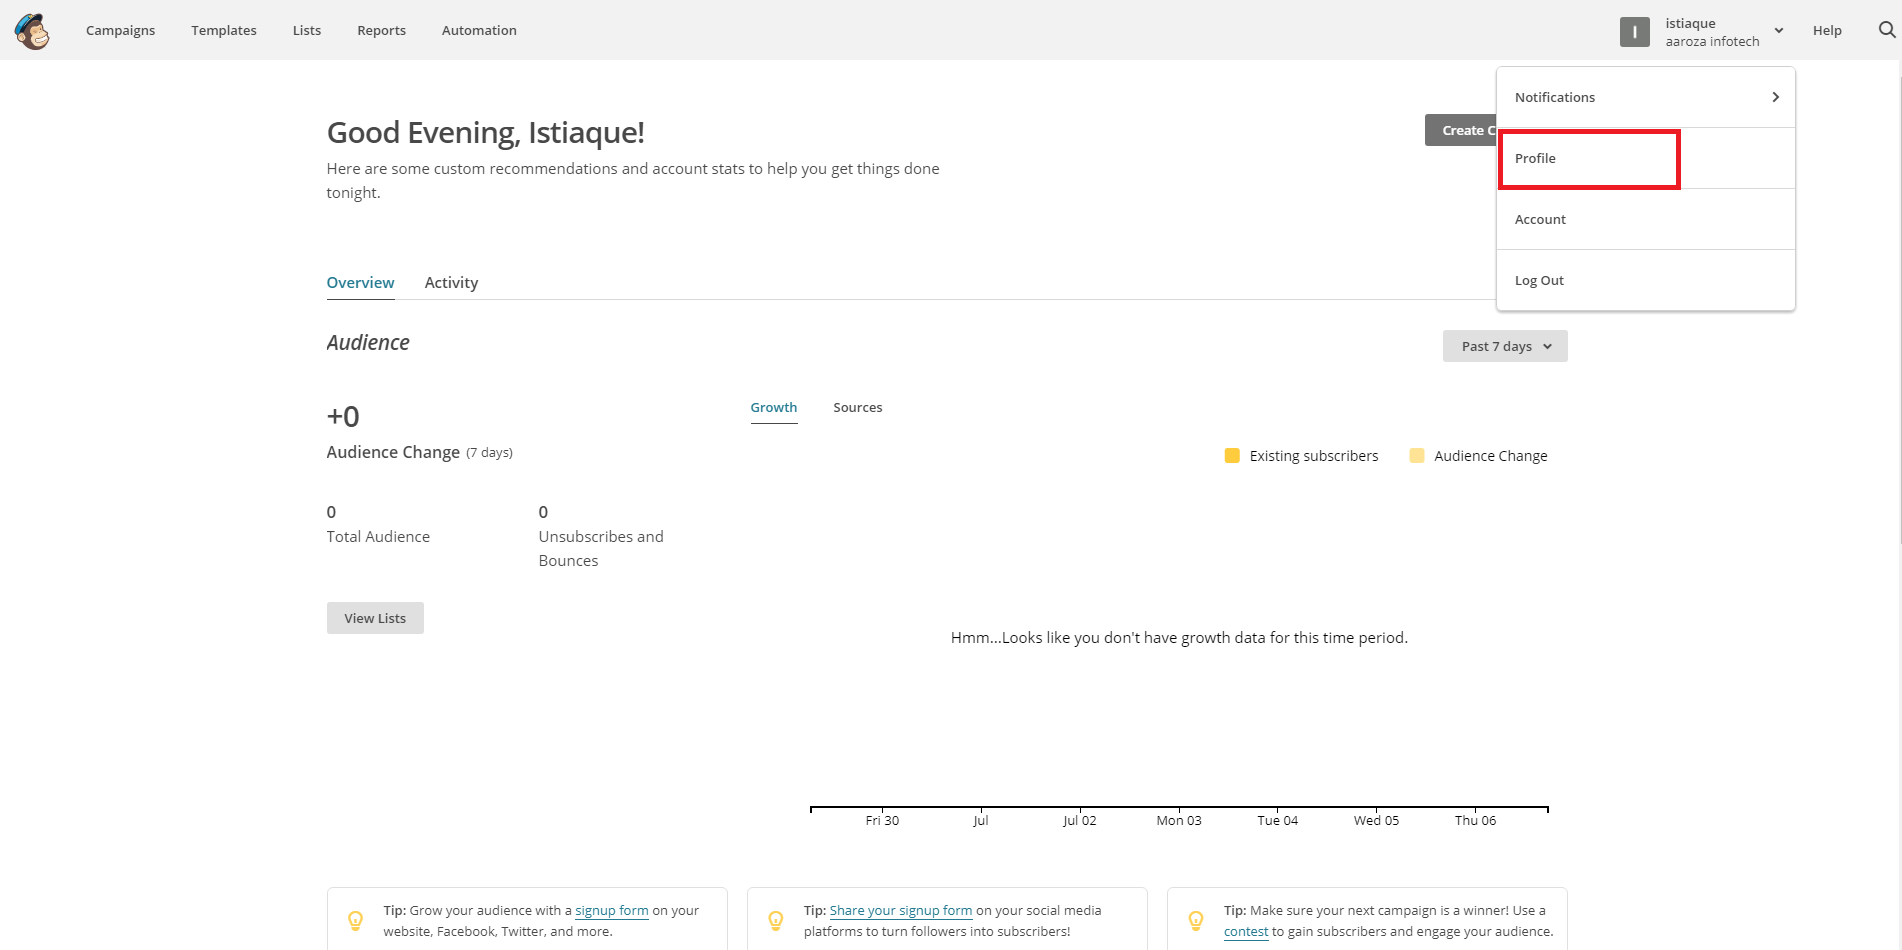
After clicking on “Profile,” you’ll see “Extras” on the navigation. Click on it, and you’ll see “API keys” on the dropdown menu.
You’ll be taken to your API Keys page where you’ll see your current API Keys if there’re any. Click on “Create A Key.”
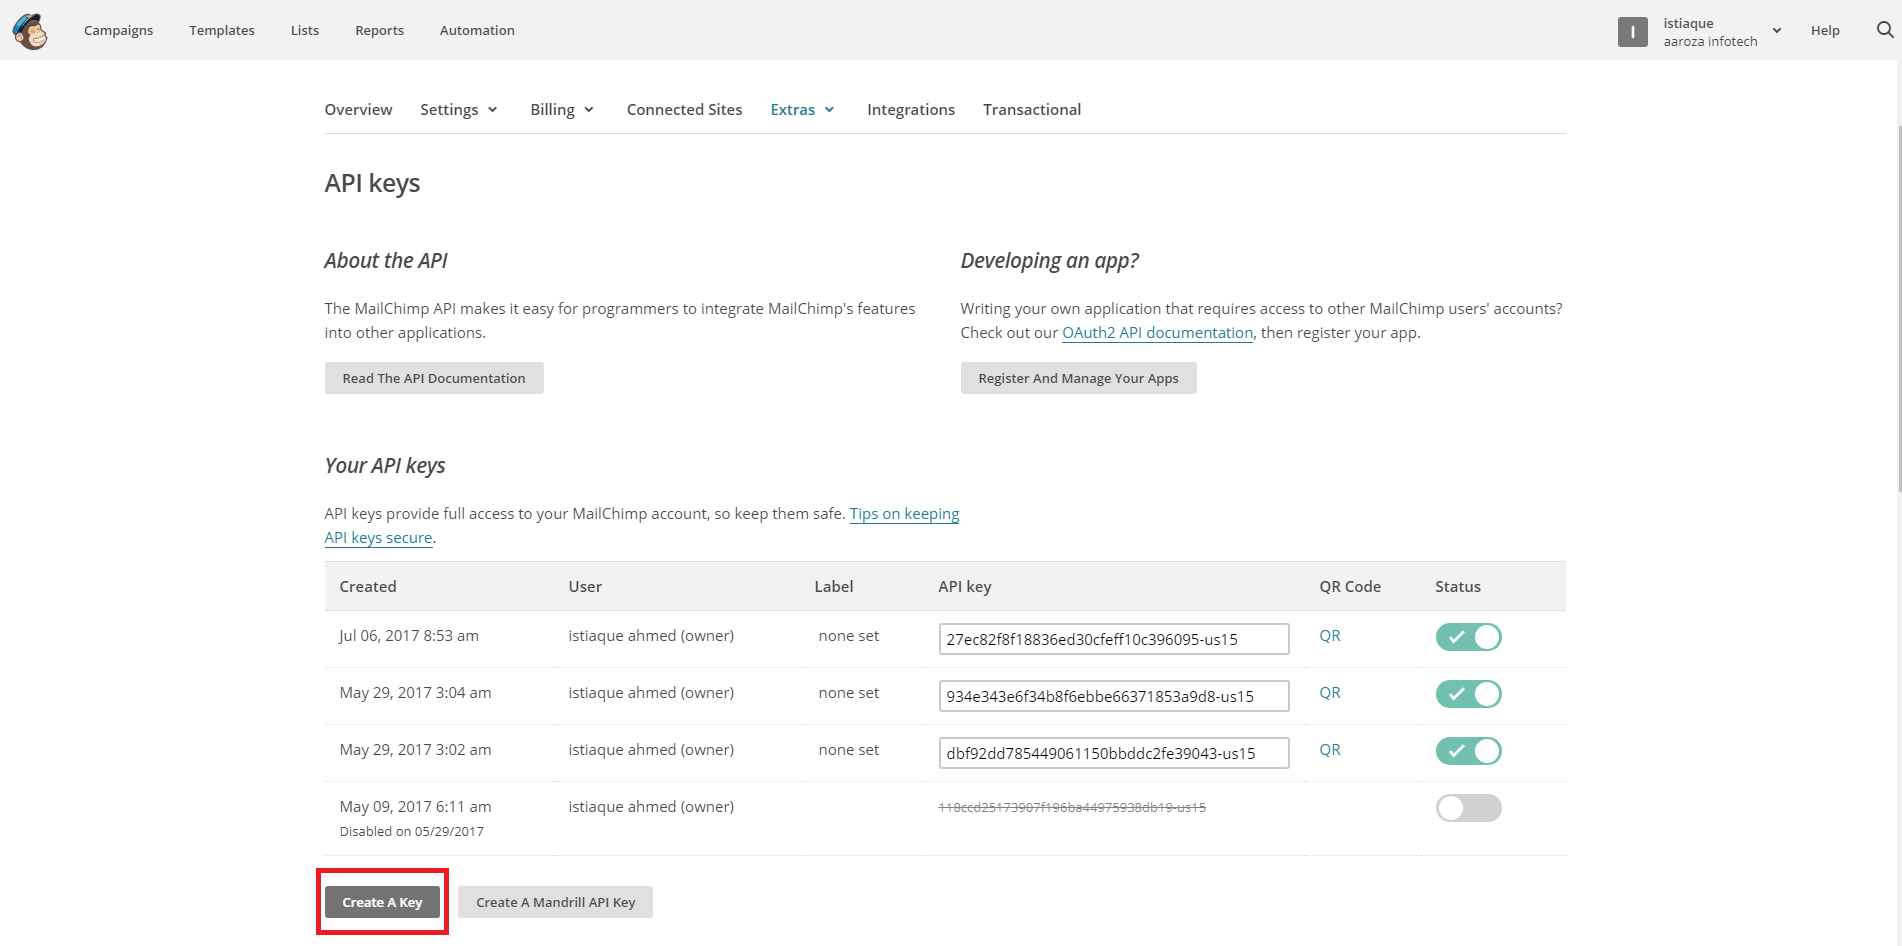
This action will generate a new API Key. Copy it.
What’s next?
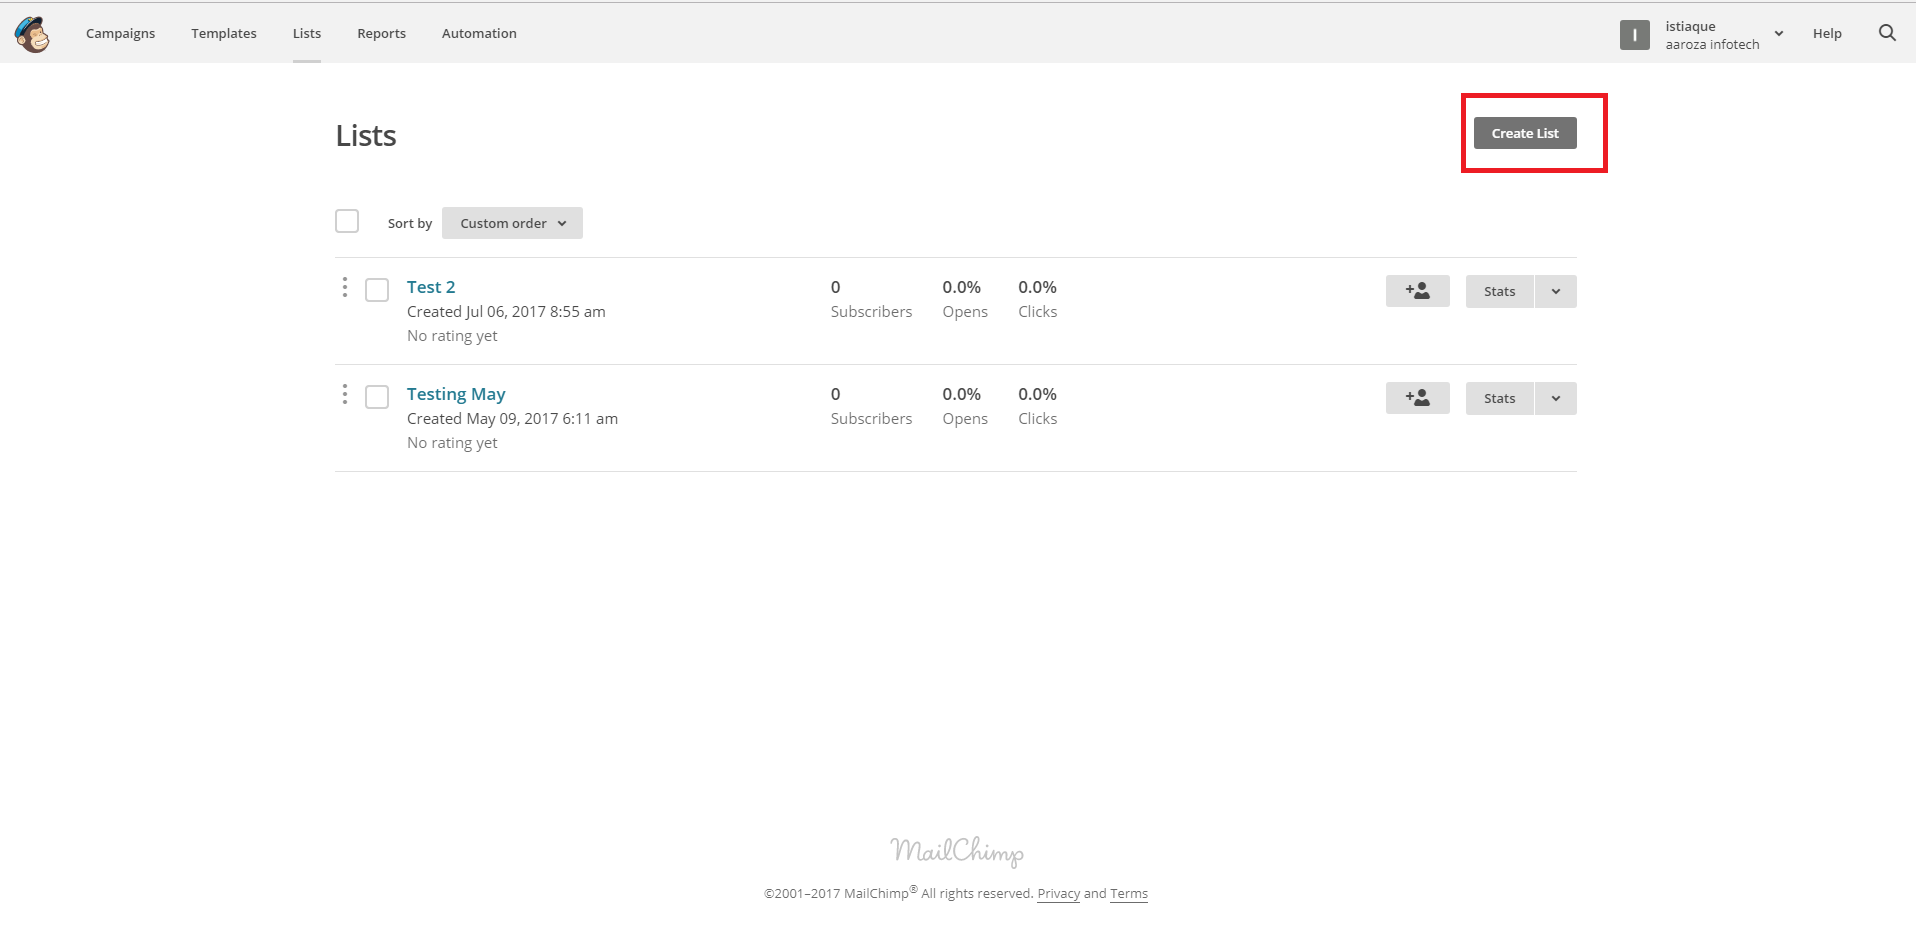
It’s time to create a new list where you’ll store the leads generated from the new API Key.
To create a list, click on “List” on the navigation. You’ll be directed to a page where you’ll see the “Create List” button. Click on that button.
Give your new list a name, and that’s it. You now have a new list where the emails generated with that API will be stored on MailChimp.
Come back to the OmniKick funnel editor where you left in step 2.
Click on “Integration,” which is available on the left side of the screen. After clicking on it, you’ll be taken to the “Integration” page, where you select your email service provider and input your API key.
Click on “MailChimp” from the list of providers available on the page. Input the key you copied from MailChimp into the “MailChimp API Key” box.

After doing that, click on “Get Campaign List” to fetch the list you’d created on MailChimp. Once the list has been fetched, click on the list name to choose the correct list.
Ensure the campaign is active by selecting “Active.”
If you want, you can turn on “Enable Double Optin.” Double optin simply means that someone who signs up to join your email list will receive an email that they’ll need to click to confirm the subscription.
While this option isn’t required, it allows you to reduce the chance of spam addresses in your list.
If you’re using other email service providers, we have different guides for the popular ones. Visit our Knowledge page to find learn how to integrate OmniKick with other services.
The main steps in the process are always the same. You just need to get the API key, create a list, and add the key to OmniKick.
Step 4: Set the display rules of your popup campaign
The display rules determine where and how your popup displays. The rules also determine who sees your campaigns. It’s vital that you set the display rules for your popup campaign.
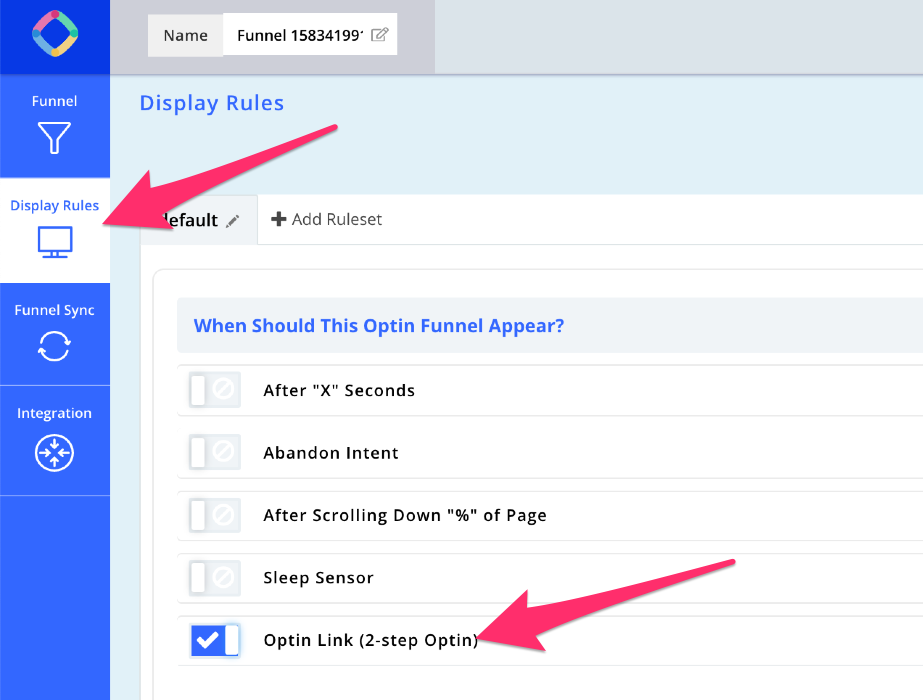
This is where OmniKick truly shines. This is where we give our users lots of options they won’t find from our competitors.
Once you’re inside the display rules page, select the “Optin Link (2-step Optin)” option. OmniKick will give you a unique code that looks like this:
data-gf-optin=”funnel365″ data-funnel-id=”5e60e3b2f74db56c26bcb64c”
All you need to do is create a link and put the code inside. The end result looks like this:
<a href=”#” data-gf-optin=”funnel365″ data-funnel-id=”5e60e3b2f74db56c26bcb64c”>Click to view this funnel</a>
As you can see the code is inside the opening <a> tag. The href attribute is set to “#” and the link now has the code inside. You can change the anchor text from “Click to view this funnel” to whatever you want.
So, on any page or post on your website where you want a link that loads this popup, simply paste this code there and use the appropriate anchor text to tell visitors what the link is about.
Using OmniKick mobile targeting options
OmniKick popup builder isn’t just for building popups for computers. You can also use it to create popups for mobile devices. Most popup builders don’t work well on mobile, and that’s a sad thing.
Various types of businesses are now generating more leads and sales on mobile than on computers. That’s because almost all consumers have mobile devices. It’s pretty easy for a consumer to search online on their mobile device anywhere they are to learn about a company or business.
According to Google, B2B companies that sell high-ticket, enterprise products, and services drives 40% of their revenue from mobile devices.
We’ve worked extremely hard to ensure that popups created with OmniKick work well on mobile devices.
Our templates are mobile-friendly. They’ve been made for both desktop and mobile screens, so you have absolutely nothing to worry about choosing OmniKick.
Inside the OmniKick dashboard, you can create popups that display only on mobile devices.
Simply go to the “Display rules” inside the Funnel Editor. Scroll down to the ‘Device Target” section. You can select or unselect if you want your popups to appear on smartphones and tablets.
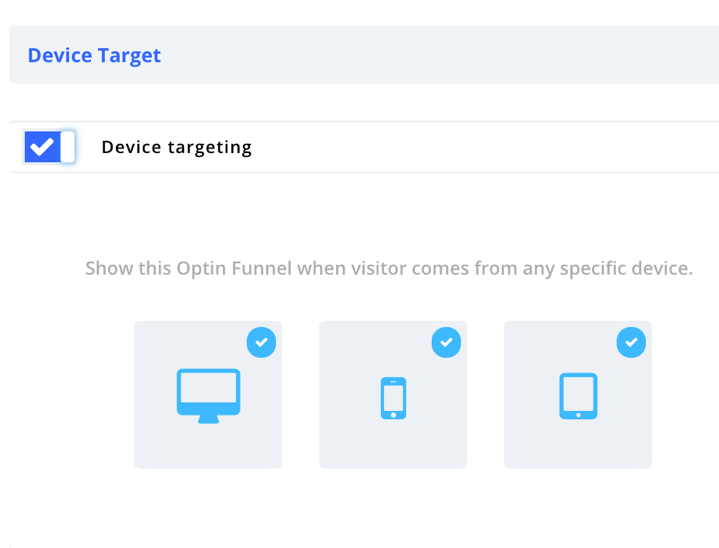
If your campaign is simply made for mobile devices, then you should choose just smartphones and tablets and uncheck desktop. When you do that, your campaign will only appear to visitors who are on smartphones and desktops.
Conclusion
Marketers are using WordPress popups to build their email subscribers. If you’re looking for the best WordPress popup tool for creating high-converting popups, OmniKick is what you need.
Sign up to start using OmniKick for free today.
Thanks for reading.
How’re you using WordPress popups to build your email list?